- Shopping, made easy.
- /
- Get the app!
【NOTES】
Only suitable for motherboards with socket stepper driver installation.
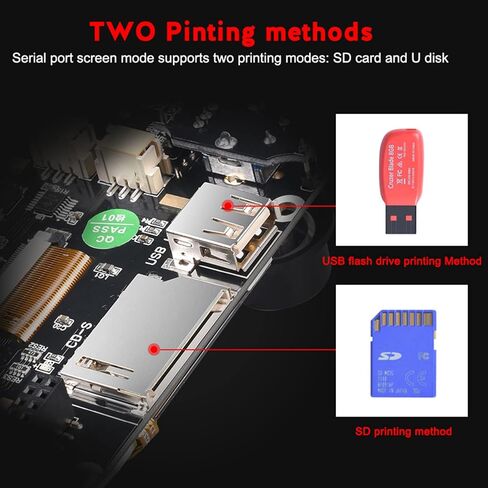
0.9-inch OLED screen, the motor current and subdivision can be modified by buttons, and displayed on the OLED, the operation is simple and convenient; in the absence of OLED, you can use the serial port to connect to the computer, and use the serial communication protocol for parameter adjustment and query
S42C V1.0 Closed Loop Driver Control Board Specification:
Maximum speed: 2000RPM
Main control chip: STM32G031G8U6, 32-bit ARM Cortex-MO+, clocked at 64MHz
【ATTENTION】
1 、When inserting the adapter board, please pay attention to the direction of the adapter board. Notice the motor and the loop chain wiring sequence!
2、For the first time, the closed-loop driver board must be connected to the motherboard with firmware, and then the encoder shall be calibrated. The calibration time will take 1-2 minutes
3、Check if the driver is installed when connecting to the computer with the serial port.
4、When the data displayed on the display or serial port is abnormal, please remove the closed-loop driver board and check if the magnet on the motor shaft is in the center position. If not, please return it to the center for recalibration.
5 、After completing the calibration, do not set it immediately after power-on. Please wait for the initialization to complete (1-2s) before setting the parameters.
6、Please do not manually turn the motor after power on.
7、The distance between the magnet at the center of the motor shaft and the core encoder should be greater than 2mm.
8 、Full stability of machine structure must be guaranteed

 Revo Six E3D RapidChange 4 Nozzle Assembly Fully Loaded Kit Replacement for the E3D V6 Hotend 1.75mm (REVO-SIX-175-24V-AS-FL)
KWD 44
Revo Six E3D RapidChange 4 Nozzle Assembly Fully Loaded Kit Replacement for the E3D V6 Hotend 1.75mm (REVO-SIX-175-24V-AS-FL)
KWD 44
 -17%
BIQU Extruder Pulley 36Teeth Bore 5mm Stainless Steel Drive Gear for 1.75mm & 3mm 3D Printer Filament (Pack of 5pcs)
KWD 2.500
-17%
BIQU Extruder Pulley 36Teeth Bore 5mm Stainless Steel Drive Gear for 1.75mm & 3mm 3D Printer Filament (Pack of 5pcs)
KWD 2.500
 BIQU H2 500℃ Extruder Direct Drive Extruder High Temperature Hotend All Metal Heat Break Dual Gear Extruder for BIQU BX BIQU B1 SE Plus DIY 3D Printer Kits
KWD 28
BIQU H2 500℃ Extruder Direct Drive Extruder High Temperature Hotend All Metal Heat Break Dual Gear Extruder for BIQU BX BIQU B1 SE Plus DIY 3D Printer Kits
KWD 28
 BIQU ANTCLABS BLTouch V3.1 Original ANTCLABS BL Touch Lastest Auto Bed Leveling Sensor BL Touch Smart Sensor for 3D Printer Part
KWD 16.500
BIQU ANTCLABS BLTouch V3.1 Original ANTCLABS BL Touch Lastest Auto Bed Leveling Sensor BL Touch Smart Sensor for 3D Printer Part
KWD 16.500