- Shopping, made easy.
- /
- Get the app!
Installation
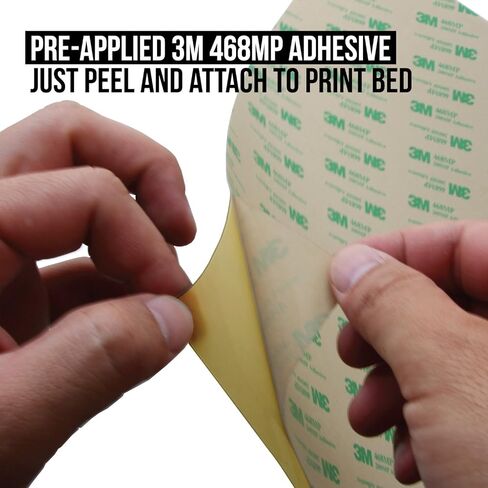
The Polyetherimide (PEI) sheet comes with 3M 468MP adhesive already laminated to the PEI. Apply the PEI with pressure and at an angle to prevent and minimize air bubbles. Once applied set the print bed to 60C and apply pressure evenly across the PEI in a sweeping fashion to firmly set the adhesive. Please use a towel to avoid getting burned. Level the bed and set the height of the nozzle before printing.
If PEI is installed to the top surface of a bed sandwich (a build plate with multiple layers), it is recommended to install PEI on top of borosilicate glass.
Use
Heat the bed to the desired temperatures for printing (60 C for PLA and 100 C for ABS). Depending on how thick your bed sandwich is, your set temperature may not be your surface PEI temperature.
Let the part cool and the print will be easy to release from the PEI surface. Parts are actually easier to remove if released before the bed becomes completely cold.
Leveling the bed is very, very important when using PEI. The first layer should be squished a little. PETG is an exception and doesn't like squished layers, in which case a Z gap should be used.
Maintenance
Clean in between prints with isopropyl alcohol. Acetone can be used instead of isopropyl alcohol, but must be used on a cold bed. Light sanding with 600 grit sand paper can be done after lots of printing to give the PEI sheet more life.
Compatibility
Build volume and bed size are not always the same! This PEI sheet precisely fits the following printers.
Creality CR-10 V2 / Creality CR-10S Pro / Creality CR-10S Pro v2 / Creality CR-X / And more! PEI can be cut to size by scoring with a hobby knife.
Dimensions
310 x 320mm (12.2 x 12.6 inches)
PEI thickness: 0.56mm (0.022 inches)
3M 468MP adhesive thickness: 0.13mm (0.005 inches)
 Gizmo Dorks PEI Sheet 3D Printer Build Surface 300mm x 300mm (11.8" x 11.8") with Laminated 3M 468MP Adhesive, Made in The USA
KWD 7.500
Gizmo Dorks PEI Sheet 3D Printer Build Surface 300mm x 300mm (11.8" x 11.8") with Laminated 3M 468MP Adhesive, Made in The USA
KWD 7.500
 Gizmo Dorks PEI Sheet 3D Printer Build Surface 235mm x 235mm (9.3" x 9.3") with Preapplied Laminated 3M 468MP Adhesive for Creality Ender 3 or CR 20 | Made in The USA
KWD 7
Gizmo Dorks PEI Sheet 3D Printer Build Surface 235mm x 235mm (9.3" x 9.3") with Preapplied Laminated 3M 468MP Adhesive for Creality Ender 3 or CR 20 | Made in The USA
KWD 7
 -13%
Gizmo Dorks PEI Sheet 3D Printer Build Surface 220mm x 220mm (8.6" x 8.6") with Laminated 3M 468MP Adhesive, Made in The USA
KWD 6.500
-13%
Gizmo Dorks PEI Sheet 3D Printer Build Surface 220mm x 220mm (8.6" x 8.6") with Laminated 3M 468MP Adhesive, Made in The USA
KWD 6.500
 Gizmo Dorks PEI Sheet 12" x 12" (305mm x 305mm) 1mm Thick 3D Printer Build Surface Ultem 1000, Made in The USA
KWD 8.500
Gizmo Dorks PEI Sheet 12" x 12" (305mm x 305mm) 1mm Thick 3D Printer Build Surface Ultem 1000, Made in The USA
KWD 8.500