- Shopping, made easy.
- /
- Get the app!
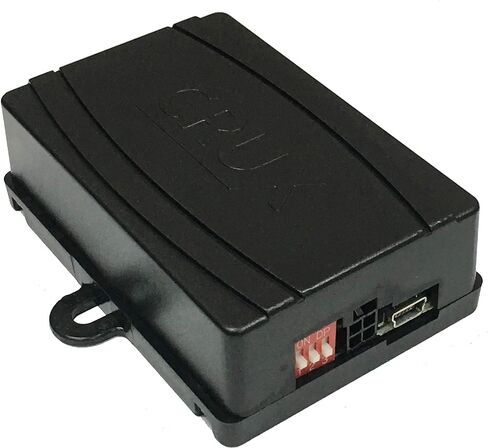
The CRUX DKVW-52B is a premium interface for select Volkswagen CAN BUS Vehicles which includes both a Single Din/Iso with pocket dash kit or a Double Din Dash Kit. The DKVW-52B interface ensures that you can keep the steering wheel audio controls and the factory backup camera (if present) in your Volkswagen vehicle when you replace the factory radio. Once you connect this interface to the wires on your new stereo's wiring harness, you've covered the power, ground, and factory speaker connections for your new stereo. The DKVW-52 interface also offers the reverse, illumination, and Vehicle Speed Sensor (V.S.S.) outputs that you'll need if you're installing a navigation receiver. The Crux interface is designed to work with the factory Volkswagen CAN-bus systems.
VEHICLE APPLICATIONS:
VOLKSWAGEN
2016 – 2018 Beetle
2016 – 2018 Jetta/ GLI
2016 – 2018 Passat
2016 – 2017 Tiguan
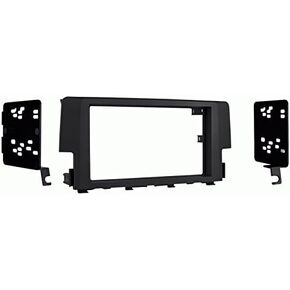
DASH KIT ASSEMBLY DIAGRAM
DOUBLE DIN INSTALLATION
1. Remove the left and right pocket support tabs.
2.Attach the left and right (DDMB) Double din mounting bracket to the mounting frame.
3. Remove the center pocket bracket on the mounting frame.
4. Insert the (DDTR) double din trim ring into the mounting frame.
5. Insert the aftermarket radio and adjust to desired fit and tighten screws
SINGLE DIN INSTALLATION
1. Attach the left and right (DDMB) Double din mounting bracket to the mounting frame.
2. Insert pocket into lower section of the mounting frame.
3. Screw the left and right (DDMB) Double din mounting bracket to the rear of the pocket with provided screws.
4. Insert radio sleeve into upper scetion of mounting frame.
5. Insert the aftermarket radio and adjust to desired fit.
 Crux SWRSB-58 Radio Replacement Accessories
KWD 33.500
Crux SWRSB-58 Radio Replacement Accessories
KWD 33.500
 Carxtc Double Din Install Car Stereo Dash Kit for a Aftermarket Radio Fits 2017-2020 Honda Civic Hatchback Lx, Sport Trim Bezel is Painted Scratch Resistant Matte Black
KWD 14.500
Carxtc Double Din Install Car Stereo Dash Kit for a Aftermarket Radio Fits 2017-2020 Honda Civic Hatchback Lx, Sport Trim Bezel is Painted Scratch Resistant Matte Black
KWD 14.500
 CRUX SWRSU-38B Subaru Radio Replacement Interface
KWD 28.500
CRUX SWRSU-38B Subaru Radio Replacement Interface
KWD 28.500
 CRUX Interfacing DKGM-16| OnStar Radio Replacement Interface w/SWC Retention, Video Switcher & Double Din Dash Kit for Select GM LAN-29 Bit Vehicles 2006-2015
KWD 55
CRUX Interfacing DKGM-16| OnStar Radio Replacement Interface w/SWC Retention, Video Switcher & Double Din Dash Kit for Select GM LAN-29 Bit Vehicles 2006-2015
KWD 55