- Shopping, made easy.
- /
- Get the app!
Features:
Candle making guide:
Step 1: measure the wax
Before you begin the candle-making process, make sure you have a clean, flat surface to work on. You can also protect the area with newspaper or paper towels. Move anything that you don't want to get wax on. Measure out how much wax you would need to fill your container.
Step 2: melt the wax
Pour the wax into your double boiler and allow to melt for 10 to 15 minutes, stirring frequently.
Step 3: add fragrance oils
When your candle wax is dissolved, it's time to add fragrance oils. Follow the instructions on your wax package for how much to add. Simply pour it into your dissolved wax and stir for a few seconds.
Step 4: attach the wick and pour the wax
Place candle wick stickers on the bottom of the wick and adhere your wick to the bottom of the jar, then pour the wax and let the wax sit five minutes to harden. Tips: before you pour the wax into your container, let it cool for a few minutes.
Step 5: secure the wick
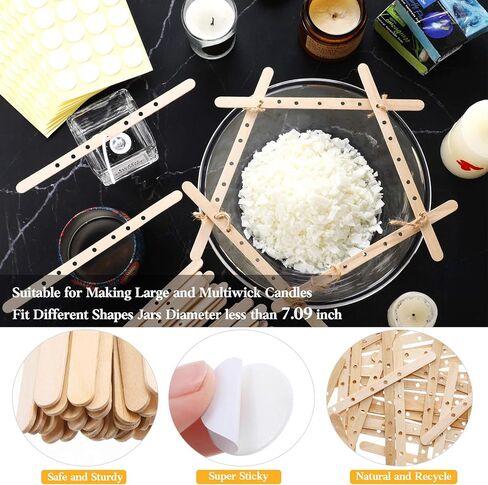
To prevent your wick from swaying in the melt wax, you need to secure it in place. Lay our wooden candle wick holders through the top of the container. Sandwich the wick in between so that it stays centered while the wax hardens.
Step 6: add more wax
If your candle hardened with an unsightly top (think cracks or holes) simply reheat and add your remaining wax.
Step 7: cut the wick
Your candle wick should be less than half an inch long. If, when lit, the candle flickers or has a tall flame, trim the wick.
Specifications:
Size: as picture shows
Material: quality wood, double sided form and heat resistance glue
Color: as picture shows
Package includes:
100 x Wooden candle wick holders
200 x Candle wick stickers
Note:
Please allow slight error on size due to manual measurement.
 3 Pieces Handheld Hole Paper Punch Metal Single Hole Paper Punch Punchers with Soft Grip and 0.25 Inch Circle 0.2 Inch Star 0.22 Inch Heart Holes for DIY Craft Tags Clothing Ticket Scrapbook Tool
KWD 5.500
3 Pieces Handheld Hole Paper Punch Metal Single Hole Paper Punch Punchers with Soft Grip and 0.25 Inch Circle 0.2 Inch Star 0.22 Inch Heart Holes for DIY Craft Tags Clothing Ticket Scrapbook Tool
KWD 5.500
 Zonon Circle Clear Acrylic Sheet, 12 x 12 Inches Round Acrylic Disc 1/16 Inches Thick Transparent Acrylic Panel for DIY Projects and Crafts (4)
KWD 4
Zonon Circle Clear Acrylic Sheet, 12 x 12 Inches Round Acrylic Disc 1/16 Inches Thick Transparent Acrylic Panel for DIY Projects and Crafts (4)
KWD 4
 Zonon 100 Pieces Black T-Shirt Washing Instructions Cards Shirt Care Instructions Cards with Shirt Graphic Customer Direction Cards Clothing Package Insert Cards for Small Business Online Shop Owner
KWD 3.500
Zonon 100 Pieces Black T-Shirt Washing Instructions Cards Shirt Care Instructions Cards with Shirt Graphic Customer Direction Cards Clothing Package Insert Cards for Small Business Online Shop Owner
KWD 3.500
 Zonon 3200 Pieces Foam Squares Double Sided Tape for Crafts 2 Sizes Adhesive Craft Foam Dots Sheet, 0.24 Inch and 0.4 Inch, 16 Sheets in Total
KWD 3.500
Zonon 3200 Pieces Foam Squares Double Sided Tape for Crafts 2 Sizes Adhesive Craft Foam Dots Sheet, 0.24 Inch and 0.4 Inch, 16 Sheets in Total
KWD 3.500