- Shopping, made easy.
- /
- Get the app!
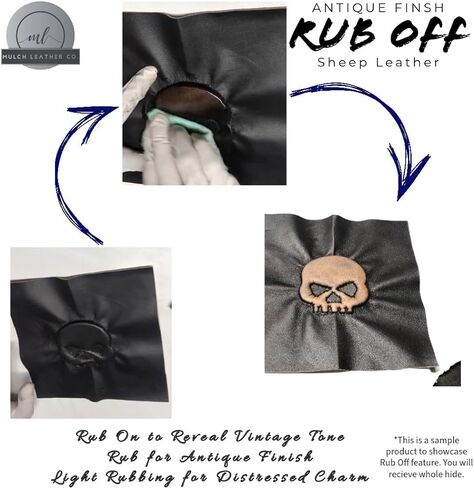
Step-by-Step Process:
1. Preparation:
Ensure your leather product is clean and free of dirt, dust, and oils.
Work in a well-ventilated area to avoid inhaling fumes from chemicals.
2. Rubbing Treatment:
Dampen a soft cloth with rubbing iso alcohol or acetone. When using the chemical use with lower concentration first. Maximum concentration of rubbing alchol recommended is 70%.
Lightly rub the damp cloth over the areas which will create variation in color.
Allow the leather to dry completely.
3. Examining:
Examine the leather to see if you've achieved the desired antique effect. If you want more distressing, you can repeat the application steps.
4. Final Touches:
Apply a leather conditioner or wax to the entire leather surface. This will help nourish and protect the leather.
If needed, gently buff the leather with a clean, soft cloth to achieve a subtle sheen.
Can also do sanding if rugged look is required, do this step before step 2:
Gently sand the areas of the leather where you want to create an antique look. Focus on edges, seams, and areas that would naturally experience wear over time.
Sand with light pressure using fine-grit sandpaper or a sanding block. The goal is to lightly remove the top dye layer and expose the lighter layer underneath.
Wipe away sanding residue with a clean, dry cloth.
 Antique Brown Whole Nappa Soft Premium Quality Sheepskin Genuine Leather Hide- NO Holes & Cuts (7-9 sq. ft)
KWD 4
Antique Brown Whole Nappa Soft Premium Quality Sheepskin Genuine Leather Hide- NO Holes & Cuts (7-9 sq. ft)
KWD 4
 FINGERINSPIRE 375 PCS (280g) Transparent Mosaic Tiles, 0.4 Inch Square Shape Glass Tiles, Crystal Clear Glass Mosaic Supplies Pieces for Crafts Home Decoration
KWD 6.500
FINGERINSPIRE 375 PCS (280g) Transparent Mosaic Tiles, 0.4 Inch Square Shape Glass Tiles, Crystal Clear Glass Mosaic Supplies Pieces for Crafts Home Decoration
KWD 6.500
 Premium Quality Crazy Horse Vegetable Tanned Crafting Whole Nappa Soft Sheepskin Genuine Leather Hide- NO Holes & CUTS (White Distressed, 12" x 12")
KWD 4.500
Premium Quality Crazy Horse Vegetable Tanned Crafting Whole Nappa Soft Sheepskin Genuine Leather Hide- NO Holes & CUTS (White Distressed, 12" x 12")
KWD 4.500
 7pcs Leather Die Cutter Hollow Punching Tool Heart Shaped Cutting Mold 20-50mm Punching Die Set for Bag Belt Wallet Handmade DIY Leather Craft
KWD 8.500
7pcs Leather Die Cutter Hollow Punching Tool Heart Shaped Cutting Mold 20-50mm Punching Die Set for Bag Belt Wallet Handmade DIY Leather Craft
KWD 8.500