- Shopping, made easy.
- /
- Get the app!
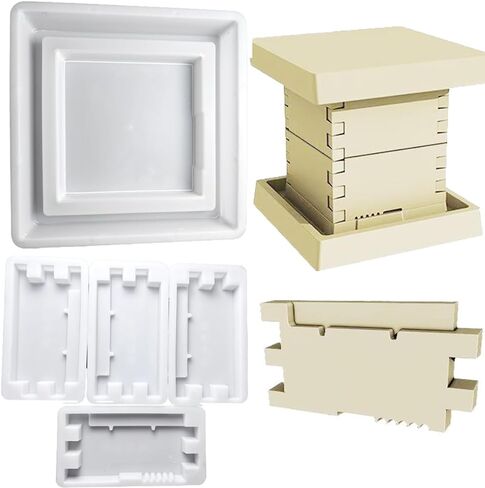
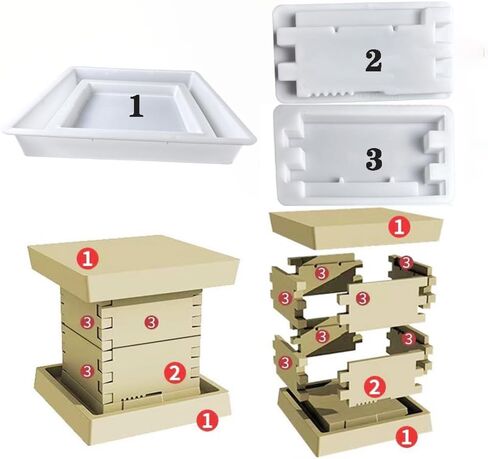
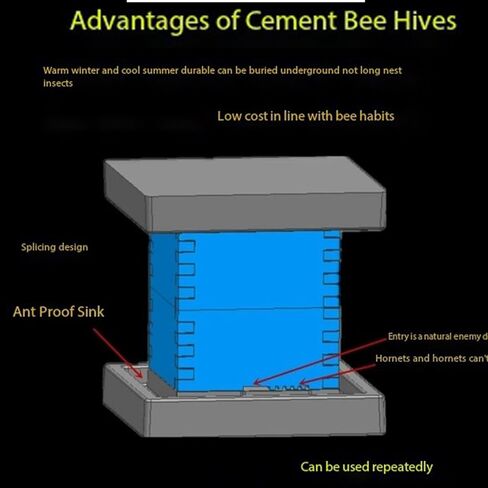
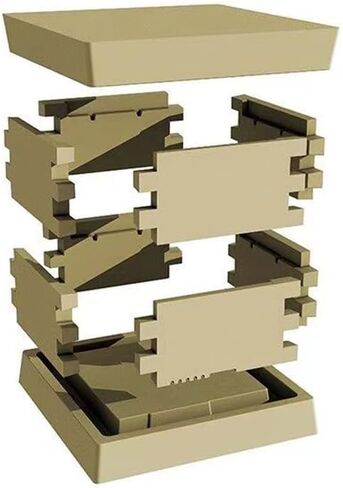
Here's a guide on how to use a plastic cement beehive mold:
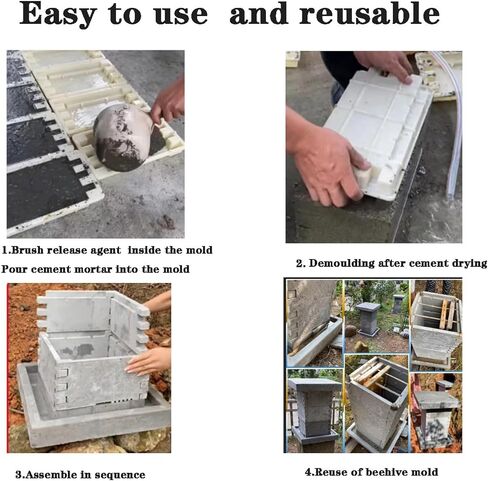
Preparation: Begin by gathering all necessary materials, including the plastic cement beehive mold, cement mixture, water, mixing tools, release agent (if needed), and a flat surface for molding.
Mixing: Prepare the cement mixture according to the manufacturer's instructions, ensuring the proper ratio of cement to water for optimal consistency. Use a mixing tool to thoroughly blend the materials until a smooth, lump-free mixture is achieved.
Applying Release Agent: If the mold requires a release agent to prevent sticking, apply a thin, even coat to the interior surfaces of the mold. This will facilitate easy removal of the cured cement later on.
Filling the Mold: Carefully pour the prepared cement mixture into the mold, ensuring it reaches all corners and cavities evenly. Use a trowel or similar tool to level the surface and remove any excess cement.
Curing: Allow the filled mold to cure undisturbed for the recommended duration, typically 24-48 hours, depending on the type of cement used and ambient conditions. Ensure the mold is placed on a level surface during curing to maintain uniformity.
Demolding: Once the cement has fully cured, gently demold the beehive component by carefully flexing or tapping the mold to release it. If necessary, use a soft tool to help loosen any stubborn areas, taking care not to damage the mold or the cured cement.
Finishing: Inspect the demolded beehive component for any imperfections or rough edges. Use sandpaper or a file to smooth out any uneven surfaces or sharp edges, ensuring a clean and professional finish.
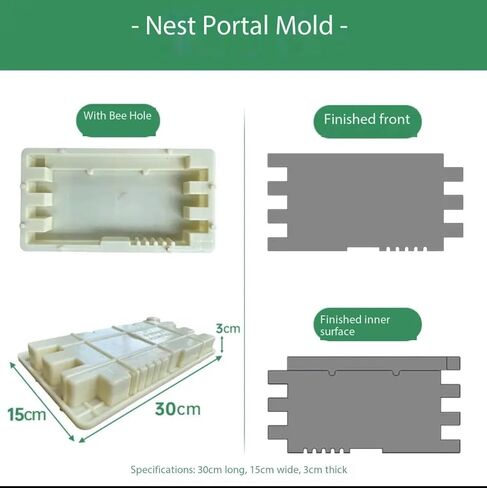
Assembly: If creating multiple components for a complete beehive, repeat the above steps as needed for each section (e.g., bottom board, supers, covers). Once all components are demolded and finished, assemble them according to the desired beehive configuration using appropriate fasteners or adhesives.
 Prashent 3Pcs Floral Foam Blocks,Green Wet Dry Flower Foam Plant Foam for Fresh & Artificial Flower Arrangements DIY Craft 5.5"L x 3.1"W x 1.7"H
KWD 3.500
Prashent 3Pcs Floral Foam Blocks,Green Wet Dry Flower Foam Plant Foam for Fresh & Artificial Flower Arrangements DIY Craft 5.5"L x 3.1"W x 1.7"H
KWD 3.500
 Brilliant Tools (BR75W) Conditioning Thermal Insulation Tool Set Fuel & air 22 Pieces, Other
KWD 29.500
Brilliant Tools (BR75W) Conditioning Thermal Insulation Tool Set Fuel & air 22 Pieces, Other
KWD 29.500
 6" x 6-1/4" Exquisite Stained Glass Small Irish Claddagh Bevel Cluster
KWD 6.500
6" x 6-1/4" Exquisite Stained Glass Small Irish Claddagh Bevel Cluster
KWD 6.500
 6 Pieces Flower Frogs Round Floral Flower Frogs for vases Holder Arranger Flower Fixed Tools Floral Arrangement Pin Holder for Flower Arrangement, Plant Fixation, 0.91 Inch, 1.02 Inch, 1.3 Inch
KWD 7.500
6 Pieces Flower Frogs Round Floral Flower Frogs for vases Holder Arranger Flower Fixed Tools Floral Arrangement Pin Holder for Flower Arrangement, Plant Fixation, 0.91 Inch, 1.02 Inch, 1.3 Inch
KWD 7.500