- Shopping, made easy.
- /
- Get the app!
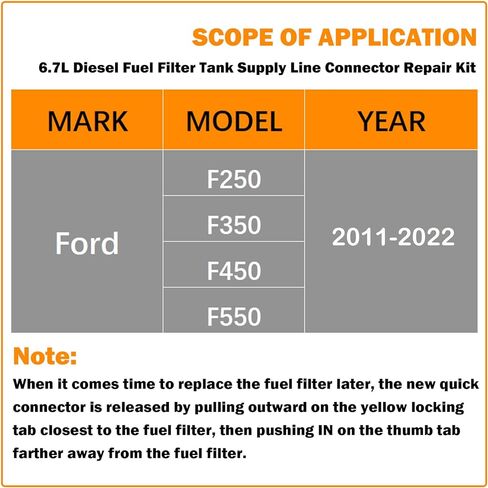
nstructions: (Always were safety goggles and other protective equipment when performing repairs and be sure to consult factory service manual, for additional precautions.) 1. Cut the factory nylon fuel line several inches from the connector. Be sure to cut the line in an area where it is straight, not on a bend. Use a very sharp razor or utility knife with a brand new blade or a specialized nylon line cutting tool in order to achieve a perfectly straight and square cut without crushing the line. 2. Cut the replacement line to the correct length. 3. Install the new quick connector to one end of the new section of line and the brass hose splicer to the opposite end. 4. Using an appropriate set of clamping pliers, install one 360 degree seal clamp at each end of the new replacement hose assembly and seat the clamps very firmly. 5. Slide the last clamp over the old hose and install the new hose assembly into the existing line on the vehicle and firmly seat the clamp. 6. Install the new quick connector to the fuel filter and push down on the yellow locking tab closest to the fuel filter to lock the quick connector in place. 7. Have someone cycle the ignition to pressurize the fuel system and carefully check for leaks. Then start the engine and continue to monitor for leakage before operating the vehicle. Note: When it comes time to replace the fuel filter later, the new quick connector is released by pulling outward on the yellow locking tab closest to the fuel filter, then pushing IN on the thumb tab farther away from the fuel filter.

 Similar to OTC 6684, Valve Spring Compressor Tool, Rotunda 303-1039 fits for Ford Camshaft, Valve Seal, Retainer and Compression of Valve Springs in 4.6L 5.4L 6.8L 3V Engine
KWD 9.500
Similar to OTC 6684, Valve Spring Compressor Tool, Rotunda 303-1039 fits for Ford Camshaft, Valve Seal, Retainer and Compression of Valve Springs in 4.6L 5.4L 6.8L 3V Engine
KWD 9.500
 E-cowlboy MerCruiser Alpha 1 Gen 2 Trim Cylinder Pin Cap Bushing Hardware Kit SEI 9B-116B,Compatible with Mercruiser Alpha I 15-9/16 and Bravo
KWD 28
E-cowlboy MerCruiser Alpha 1 Gen 2 Trim Cylinder Pin Cap Bushing Hardware Kit SEI 9B-116B,Compatible with Mercruiser Alpha I 15-9/16 and Bravo
KWD 28
 E-cowlboy CMBRAVO3KITA for Mercury Bravo 3 Stern Drives 2004 &Up Aluminum Anode Kit,Replaces OEM 888761Q02 888761Q04
KWD 15
E-cowlboy CMBRAVO3KITA for Mercury Bravo 3 Stern Drives 2004 &Up Aluminum Anode Kit,Replaces OEM 888761Q02 888761Q04
KWD 15
 3164088 for Cummins ISX ISX15 QSX QSX15 Cam Bearing Adapter Tool Set Camshaft Bearing Installation and Removal Tool Kit M20060-39 M2006039
KWD 91
3164088 for Cummins ISX ISX15 QSX QSX15 Cam Bearing Adapter Tool Set Camshaft Bearing Installation and Removal Tool Kit M20060-39 M2006039
KWD 91