- Shopping, made easy.
- /
- Get the app!
Say goodbye to signal dead zones and messy cables, and welcome a seamless online experience with this essential addition to your Starlink Internet Kit.
Starlink gen 3 mount Key Features:Space Saving,ABS Stability,Effortless Installation
Installation Guide
The power supply:
1.Secure the mount to the wall using provided screws and anchorsor No-Drill install using provided adhesive Tape.
2.Tilt the power supply onto the wall mount and center it
3.Press the power to secure it.(If you want to remove power supply ,push the clip of wall mount,and take out the power .)
The router mount:
1.Secure the mount to the wall using provided screws and anchorsor No-Drill install using provided adhesive Tape.
2.Connect the power cable and RJ45 cable with the router through the mount.
3.Tilt the router onto the wall mount and center it .
 MeshForce M3 Dot Wall Plug WiFi Extender, Works with MeshForce M1 and M3 Whole Home Mesh WiFi System – Use with only MeshForce WiFi System
KWD 28
MeshForce M3 Dot Wall Plug WiFi Extender, Works with MeshForce M1 and M3 Whole Home Mesh WiFi System – Use with only MeshForce WiFi System
KWD 28
 TP-Link Deco AX5700 Tri-Band Smart Whole Home Mesh Wi-Fi 6 System (2-Pack)
KWD 116
TP-Link Deco AX5700 Tri-Band Smart Whole Home Mesh Wi-Fi 6 System (2-Pack)
KWD 116
 TP-Link Deco AX5700 Tri-Band Smart Whole Home Mesh Wi-Fi 6 System (2-Pack) (Renewed)
KWD 59.500
TP-Link Deco AX5700 Tri-Band Smart Whole Home Mesh Wi-Fi 6 System (2-Pack) (Renewed)
KWD 59.500
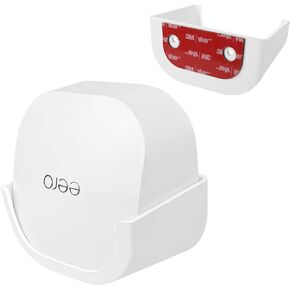 HOLACA Screwless Wall Mount for eero 6 Dual-Band mesh Wi-Fi 6 Router Holder, No Tools Required, Easy to Install, No Drilling, Strong VHB Adhesive Mount (1 Pack)
KWD 6
HOLACA Screwless Wall Mount for eero 6 Dual-Band mesh Wi-Fi 6 Router Holder, No Tools Required, Easy to Install, No Drilling, Strong VHB Adhesive Mount (1 Pack)
KWD 6