- Shopping, made easy.
- /
- Get the app!
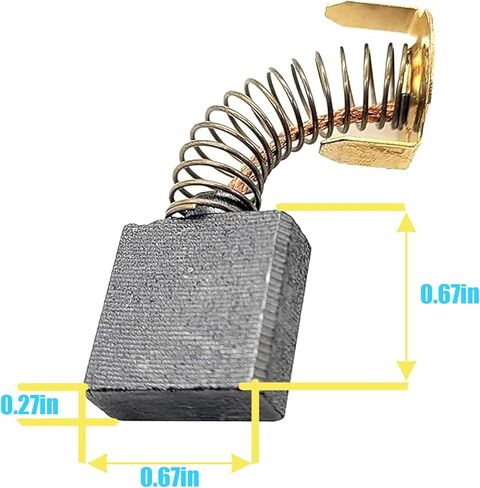
Carbon brush & lead set compatible with (but not limited to):
Dewalt:
Tile saw: D24000 Type 1, D24000 Type 2, D24000S Type 1.
Miter saw: DW703 Type 3, DW703-B3 Type 3, DW703-BR Type 3, DW713 Type 1, DW713 Type 2, DW713-B3 Type 1, DW713-B3 Type 2, DW713-BR Type 1, DW713-BR Type 2, DW715 Type 3, DW715-B3 Type 3, DW715-BR Type 3, DW716 Type 20, DW716XPS Type 20, DWS780 Type 20, DWS782 Type 20.
Bevel miter saw: DWS709 Type 20.
Doubl bevel saw: DWS779 Type 20.
Ryobi table saw: BTS21, BTS20R-1, BTS211, RTS31, BTS16.
Ridgid table saw: R4092, R4516.
Craftsman table saw: 315218050
【Easy Repair Fix】 Worn brushes are a common causes of intermittent motor function, reduced electric braking and reduced motor power, Replacing brushes can fix a motor that's operating intermittently.
【Warm tip】Worn brushes can cause the motor to smoke or spark and should be replaced if it occurs. When replacing carbon brushes, be sure to inspect your armature for burns, cracks, or other damage which can indicate larger motor problems that may not be solved by replacing the carbon brushes.
【Installation tips】Before installation unplug the saw from the outlet. Unscrew the brush cap with screwdriver, remove the old brush, insert the new brush and hold it in place with a finger while sliding the cap back on. Then secure with screwdriver.
 Superior Electric L50 Aftermarket Trigger Switch 24/12A-125/250V
KWD 5.500
Superior Electric L50 Aftermarket Trigger Switch 24/12A-125/250V
KWD 5.500
 5 Pairs Carbon Brushes Compatible with Makita HP1631 HP1631K GV5000 191998-3 CB85 CB57 CB64 5x8x11mm Power Tools Replacement Spare Part
KWD 4
5 Pairs Carbon Brushes Compatible with Makita HP1631 HP1631K GV5000 191998-3 CB85 CB57 CB64 5x8x11mm Power Tools Replacement Spare Part
KWD 4
 Bosch 4100 Table Saw (2 Pack) Replacement Toothed Gear # 2610996896-2PK
KWD 6
Bosch 4100 Table Saw (2 Pack) Replacement Toothed Gear # 2610996896-2PK
KWD 6
 OEM N487793 Replacement for DeWalt Angle Grinder Guard DWE43066 DWE43066N DWE43116 DWE43140 DWE43144 DWE43144N
KWD 14.500
OEM N487793 Replacement for DeWalt Angle Grinder Guard DWE43066 DWE43066N DWE43116 DWE43140 DWE43144 DWE43144N
KWD 14.500