- Shopping, made easy.
- /
- Get the app!
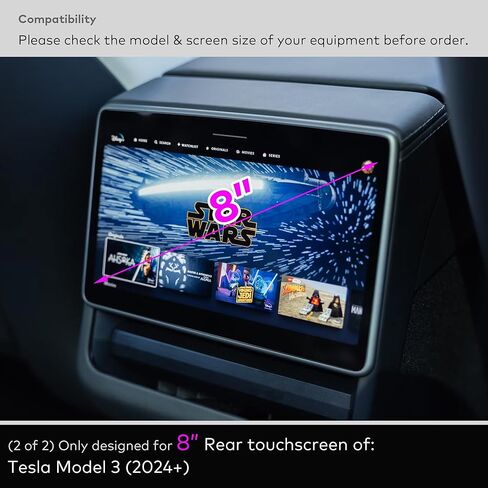
This set screen protector compatible with the touchscreen for:
(2024) Tesla Model 3 - 15" (front) + 8" (Rear)
Package Includes:
1* 15" Matte glass screen protector
1* 8" Matte glass screen protector
2* Installation accessories
1* Installation frame for 15" screen
Installation Steps:
FRONT:
1. PREPARE: Open the package, close the window, turn off A/C, confirm the interior space dust-free.
2. CLEAN: Set the screen to clean mode, first clean the screen with the alcohol wipe, then the microfiber cloth, and lastly use the dust sticker remove all dusts remaining.
3. ALIGN: Put on the installstion frame to hold the screen with "TOP" words on TOP. Check the screen protector's right position - The curved edge should be bottom side. Peel off the glass's back released film and hold the border to let the glass's bottom side stand on the frame's interior bottom side, be sure keep it in the middle of left and right. And then put the screen protector down to the screen slowly, finger a line cross the glass's top to bottom, it will absorb automaticlly. Take off the frame now.
4. SQUEEGEE: Use the provided squeegee to press out the bubbles, expecially for the 4 lines inside of the black-printed border. For stubborn bubbles carefully lift up the glass (most close to the bubble) all the way to the bubble and re-apply.
REAR:
The steps of the rear screen protector installastion is same for Steps 1/2/4. Only difference is the steps of 3. You need use the provided sucker to hold the glass to let it posited right instead of frame.
If you have any questions or problems please feel free contact us, we'll get back to you soon.
![[2-PACK] INNOSURE Tempered Glass Screen Protector Designed for Nissan Maxima (2016-2023), Murano (2016-2024), Nissan Kicks (2021-2024), Versa (2020-2024) 8 Inch Touch Screen Protector Accessories Anti Glare (Matte)](https://cdn1.tilga.com/md/prod/2/424/3/49505182.24561.jpg) [2-PACK] INNOSURE Tempered Glass Screen Protector Designed for Nissan Maxima (2016-2023), Murano (2016-2024), Nissan Kicks (2021-2024), Versa (2020-2024) 8 Inch Touch Screen Protector Accessories Anti Glare (Matte)
KWD 6.500
[2-PACK] INNOSURE Tempered Glass Screen Protector Designed for Nissan Maxima (2016-2023), Murano (2016-2024), Nissan Kicks (2021-2024), Versa (2020-2024) 8 Inch Touch Screen Protector Accessories Anti Glare (Matte)
KWD 6.500
 INNOSURE 8.8 Inch Glass Screen Protector Designed for Toyota GR Supra (2020-2024) 2.0 3.0 3.2 A90 A91 MK5 Multi-media GPS Touchscreen 8.8" Center Control Protecting Accessories (HD Clear)
KWD 6.500
INNOSURE 8.8 Inch Glass Screen Protector Designed for Toyota GR Supra (2020-2024) 2.0 3.0 3.2 A90 A91 MK5 Multi-media GPS Touchscreen 8.8" Center Control Protecting Accessories (HD Clear)
KWD 6.500
 Glass Screen Protector for 2021 2022 2023 2024 Ford Bronco 12 Inch Touchscreen Infotainment Accessories Anti Glare (Matte)
KWD 8.500
Glass Screen Protector for 2021 2022 2023 2024 Ford Bronco 12 Inch Touchscreen Infotainment Accessories Anti Glare (Matte)
KWD 8.500
 Tempered Glass Screen Protector for (2021/2022/2023/2024) Polestar 2 Infotainment 11.2 Inch Touchscreen Anti Finger Print (HD Clear)
KWD 8
Tempered Glass Screen Protector for (2021/2022/2023/2024) Polestar 2 Infotainment 11.2 Inch Touchscreen Anti Finger Print (HD Clear)
KWD 8