- Shopping, made easy.
- /
- Get the app!
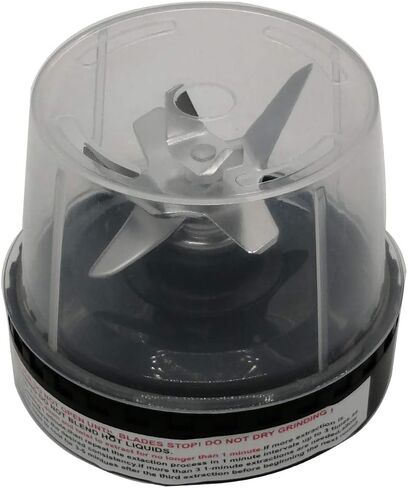
Replacement blade assembly (6-fin as pictured) with 32oz cup and cup lid for Nutri Ninja Blender. Fits Nutri NinjaProBL450-70/BL456-70/BL451-70/BL454-70 Nutri Ninja Auto-iQ BL480-70/BL480D-70/BL481-70/BL482-70/BL490-70 Nutri Ninja Auto-iQ Pro Complete BL487-70/BL488W-70/BL487A-70/BL486CO-70 Nutri Ninja Auto-iQ Compact System BL491-70/BL492-70/BL492W-70 KIND REMINDER BEFORE PURCHASE: 1: Your original motor base must be 6 fins. The Nutra Ninja Replacement Blade can't fit all the 6fins blender's motor base: there are too many models of ninja blender blade, if the last two digitals(not part of model #) or any character is difference, please don't purchase it 2: Your blender model must be identical with our stated model. Please check your model carefully before purchasing. TIPS FOR USAGE 1. You are recommended to replace your ninja blender every 6 months or as needed for optimal performance 2. Please check whether the gear of the bottom loosen or tighten before use. If it's loosen, please tighten it 3. Please check the rubber gasket and be sure it is put snugly into the bottom blade. (The rubber gasket is used to avoiding leakage) 4. Do not overfill! To avoid spilling, do not add ingredients past the "Max" fill line 5. Place the replacement blade onto the cup and screw it tightly until you have a good seal 6. Please make sure it in right place and locked tightly 7. Do not run your blender over 4 minutes at a time to prevent overheating of the blender.
 2pcs Replacement 20 oz bright Sport Bottle cup with lid for Oster MyBlend blender BLSTPB models and BLSTP2 models blender
KWD 8
2pcs Replacement 20 oz bright Sport Bottle cup with lid for Oster MyBlend blender BLSTPB models and BLSTP2 models blender
KWD 8
 -14%
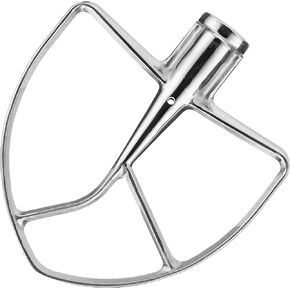
Replacement parts,Stainless steel Flat Beater Attachment,compatible with Kitchenaid 6Qt,7 Qt and 8 Quart Stand Mixers(KP26M1, KP26M1XFQ,KSM7990, KSM7581,KSM8990ER0, KSM8990ES0, KSM8990NP0)
KWD 15.500
-14%
Replacement parts,Stainless steel Flat Beater Attachment,compatible with Kitchenaid 6Qt,7 Qt and 8 Quart Stand Mixers(KP26M1, KP26M1XFQ,KSM7990, KSM7581,KSM8990ER0, KSM8990ES0, KSM8990NP0)
KWD 15.500
 JOYSTAR Replacement parts of 18oz cup,compatible with NutriBullet Blender Combo(ZNBF30400Z/ZNBF30500Z/)/Select Blender 1200(NB07200-1210) /PRO 1000/ Select Blender (18oz)
KWD 5.500
JOYSTAR Replacement parts of 18oz cup,compatible with NutriBullet Blender Combo(ZNBF30400Z/ZNBF30500Z/)/Select Blender 1200(NB07200-1210) /PRO 1000/ Select Blender (18oz)
KWD 5.500
 1 pcs Replacement Part 33 oz cup with seal Lid for Magic Bullet Blender, Mixer, Juicer, Food Processor (MBR-1701 /MBR-1702 /MBR-1101/ MB-BX1770-02/ MB1001/ MBR-0301)
KWD 8.500
1 pcs Replacement Part 33 oz cup with seal Lid for Magic Bullet Blender, Mixer, Juicer, Food Processor (MBR-1701 /MBR-1702 /MBR-1101/ MB-BX1770-02/ MB1001/ MBR-0301)
KWD 8.500