- Shopping, made easy.
- /
- Get the app!
Fit for Models
2003 Dodge Ram 1500 2500 3500 4500 5500
2004 Dodge Ram 1500 2500 3500 4500 5500
2005 Dodge Ram 1500 2500 3500 4500 5500
2006 Dodge Ram 1500 2500 3500 4500 5500
2007 Dodge Ram 1500 2500 3500 4500 5500
2008 Dodge Ram 1500 2500 3500 4500 5500
2009 Dodge Ram 1500 2500 3500 4500 5500
2010 Dodge Ram 1500 2500 3500 4500 5500
2011 Dodge Ram 1500 2500 3500 4500 5500
2012 Dodge Ram 1500 2500 3500 4500 5500
2013 Dodge Ram 1500 2500 3500 4500 5500
2014 Dodge Ram 1500 2500 3500 4500 5500
2015 Dodge Ram 1500 2500 3500 4500 5500
2016 Dodge Ram 1500 2500 3500 4500 5500
2017 Dodge Ram 1500 2500 3500 4500 5500
2018 Dodge Ram 1500 2500 3500 4500 5500
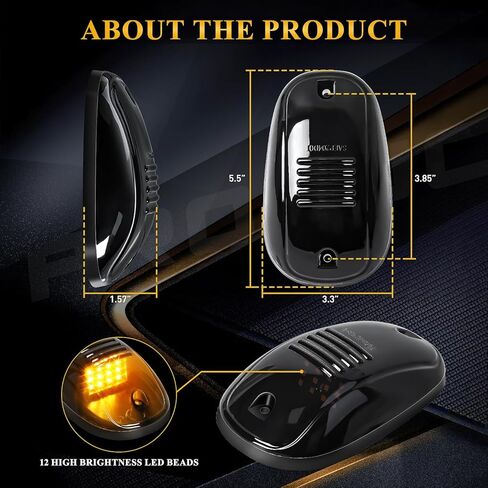
Specification:
Voltage: 12V
PC Len Color: Smoke
Light Source Color: Amber
Install Placement: Car Roof
Led Number: 12 LEDs (per light)
Hole Distance: 3.85-inch
Light Size:
5.5-inch x 3.3-inch x 1.57-inch (L x W x H)
Package Includes:
5 x Cab Marker LED Lights Assembly
5 x Soft Pads
1 x Switch
10 x Screws
1 x Wire Harness
1 x Wire Resistors
5 x Wiring Accessories
How To Install
For Replacement of Existing Lights
Connect the positive of the light to the car's power and the negative to the car's ground. (Red wire is positive, white wire is negative)
For First Installation
1. Expose the wires by removing the entire front map light assembly.
2. Measure the your truck roof where you're going to install the LED cab roof lights and mark the points where you will be drilling the roof.
3. Drill 3 holes on the roof for per LED light. One hole at each end of the LED light and one hole in the center for wiring.
4. Place the pad under the cab light and tighten the screws to secure the light to the roof of the car.
5. Connect LED Cab Lights in parallel. Secure the wiring connections with tape. Run the wires through the front map light assembly to complete the wiring section.
6. The positive of the switch is connected to the light wire and the power source, and the negative is connected to the ground wire.
7. Done.
Tip: The mounting holes of the light are on the front and back and professional installation is highly recommended.
Note: Before installation, please power on the light to test whether it can be used normally.
 -11%
Philips 1156ALED Ultinon LED (Amber), 2 Pack
KWD 8.500
-11%
Philips 1156ALED Ultinon LED (Amber), 2 Pack
KWD 8.500
 10PCS 1157 Brake Marker Bulb Replacement, 1016 12V 21/5W BAY15D White Rear Brake Light Bulb, 12524 ECE High Low Foot Dual Beam Turning Light Motorcycle Tail Light (Transparent)
KWD 4
10PCS 1157 Brake Marker Bulb Replacement, 1016 12V 21/5W BAY15D White Rear Brake Light Bulb, 12524 ECE High Low Foot Dual Beam Turning Light Motorcycle Tail Light (Transparent)
KWD 4
 5x LED Top Roof Cab Marker Clearance Running Light Smoke Lens Amber Lights w/Wire Compatible with Ford F150 F250 F350 1973-1997 F Series Super Duty Pickup Trucks
KWD 11
5x LED Top Roof Cab Marker Clearance Running Light Smoke Lens Amber Lights w/Wire Compatible with Ford F150 F250 F350 1973-1997 F Series Super Duty Pickup Trucks
KWD 11
 Traffic Advisor Light Bar, 22.7-inch 80 Led Interior Windshield Flashing Warning Emergency Strobe Light Bar for Trucks, Construction Vehicles, Snow Plow Trucks, Tow Trucks (Amber)
KWD 8.500
Traffic Advisor Light Bar, 22.7-inch 80 Led Interior Windshield Flashing Warning Emergency Strobe Light Bar for Trucks, Construction Vehicles, Snow Plow Trucks, Tow Trucks (Amber)
KWD 8.500