- Shopping, made easy.
- /
- Get the app!
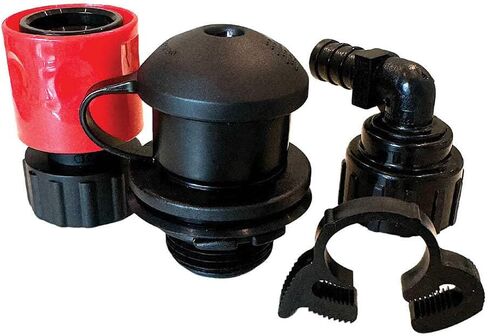
MERCURY INSTALLATION GUIDE:
1). Remove the original OEM plug from the engine cowling.
2). Unscrew the OEM plug from the 3/4" female hose receptacle.
3). Separate the OEM plug from the lanyard by rotating it in a counterclockwise rotation until free.
4). Fit the Flush-M Mercury to the lanyard & the ¾" female hose receptacle.
5). Install the Flush-M Mercury back into the engine cowling, securing it in place with a ¼ turn in a clockwise rotation.
6). If required, use a wrench on the male quick-connect collar for added leverage. Do not overtighten past ¼ turn.
SUZUKI INSTALLATION GUIDE:
1). Remove the original OEM plug from the engine cowling.
2). Remove the cap from the Flush-M by twisting counter clockwise ¼ turn and pull outward.
3). Install the Flush-M into the cowling by rotating it in a clockwise direction until firm, using a 5/8th wrench for added leverage if necessary. Do not over-tighten.
YAMAHA & HONDA INSTALLATION GUIDE:
1). Separate the OEM Yamaha & Honda Flush port from its base by unscrewing it in a counter-clockwise direction until free.
2). Securely screw the black male quick connect into the Yamaha or Honda flush port and the black female quick release onto the base.
3). Connect the 2 newly installed ends to one another.
SIMPLIFIED ENGINE FLUSHING:
1). Prepare for Operation or Flushing: Your engine is now ready to be operated or flushed.
2). Disconnect the Quick Connects: To flush, simply disconnect the male from the female quick connect.
3). Attach to Water Source: Attach the male end to your water source using the included red hose connector.
4). Flush the Engine: Flush the engine for the recommended 15 minutes.
5). Reconnect the Quick Connects: Upon completion, reconnect the male back into the female Quick Connect.

 Texas Tough All-In-One Box 370 total bags
KWD 11.500
Texas Tough All-In-One Box 370 total bags
KWD 11.500
 Norsea-Stainless Steel Clam Shell Vent, Wire Cable Cover, Outlet,Cap, Clamshell -One Piece Structure and Streamlined Design for Boats, RVs and Outdoor Application -Pack of 2 PCS
KWD 4.500
Norsea-Stainless Steel Clam Shell Vent, Wire Cable Cover, Outlet,Cap, Clamshell -One Piece Structure and Streamlined Design for Boats, RVs and Outdoor Application -Pack of 2 PCS
KWD 4.500
 SeaSense Boat Ladder (4 Step)
KWD 29
SeaSense Boat Ladder (4 Step)
KWD 29
 -14%
Seachoice Pontoon Gate Latch Replacement Kit, Fits 1-1.25 In. Square Frames, Includes Hardware
KWD 6
-14%
Seachoice Pontoon Gate Latch Replacement Kit, Fits 1-1.25 In. Square Frames, Includes Hardware
KWD 6