- Shopping, made easy.
- /
- Get the app!
Specification:
Material: Resin, Plastic
Quantity: 1 PCS
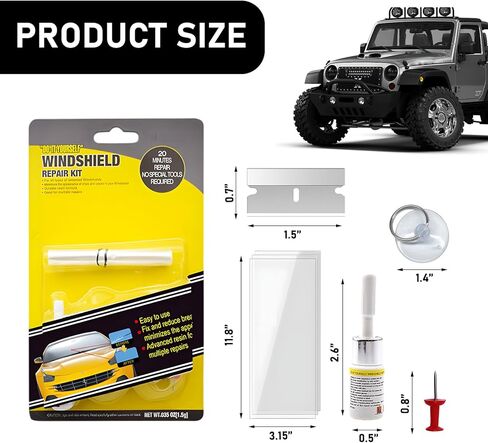
Style: Windshield Repair kit+Pressure Syringe/ Crack Repair Kit
Weight: 0.1 lb
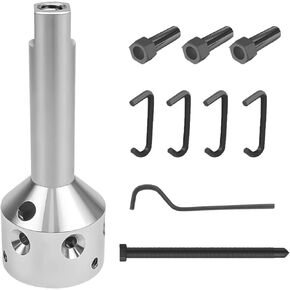
Package Includes: 1 Positioning Bracket, 1 Pressure Rod, 1 Repair Fluid, 1 Pressure Syringe, 1 Blade, 1 Push Pin, 5 Curing Films/ 1 Repair Fluid, 1 Curing Film, 1 Blade, 1 Push Pin
Feature: Efficient, Practical, Proffesional
Fit Type: Universal Fit
-Use Instructions for the Basic Kit:
-First, clean the damaged area with a push pin or blade to remove loose glass fragments and wipe the area with a towel to ensure it is dry.
-Second, apply the repair fluid directly to the crack, use the blade to spread it and ensure it fills the damage.
-Third, smooth the repair fluid to remove air bubbles. Apply a curing film, then expose the repair to sunlight or UV light for 10-30 minutes.
-Use Instructions for the Advanced Kit:
-First, position the bracket over the crack, press the suction cups to secure it, and apply repair fluid to the pressure rod.
-Second, insert the rod into the bracket's hole, screw it in slowly and ensure the resin fills the crack.
-Third, attach the syringe to the bracket, pull the plunger to create a vacuum, wait 10 minutes, then pull to the second notch for additional pressure.
-Next, apply a curing film and expose it to sunlight or UV light for 10-30 minutes.
-Notes:
-Do not operate in UV light environments. Repair fluid must be shielded from UV light to ensure proper curing.
-Ensure all air bubbles are removed from the damaged area before curing.
-Do not cure the repair until the resin has fully penetrated the damage.
-Rotate the pressure rod slowly. Excessive rotation or pressure may crack the glass.
-The kit cannot repair glass with holes that have penetrated through the surface.
 AME 15300 Molded Rubber Wheel Chock
KWD 7
AME 15300 Molded Rubber Wheel Chock
KWD 7
 -6%
Xiaoyudou POW352003 Valve Spring Compressor Tool Kit Compatible with Dodge Ram 2500 3500 5.7L 6.1L 6.2L 6.4L HEMI Cummins
KWD 15
-6%
Xiaoyudou POW352003 Valve Spring Compressor Tool Kit Compatible with Dodge Ram 2500 3500 5.7L 6.1L 6.2L 6.4L HEMI Cummins
KWD 15
 YehVeh 2 Pack Car Alternator Clutch Free Wheel Pulley Install Removal Tool 33T Teeth Engine Sprocket for Audi A3 TT Vento VW Golf Passat Ford Peugeot Volvo Spare Parts
KWD 4
YehVeh 2 Pack Car Alternator Clutch Free Wheel Pulley Install Removal Tool 33T Teeth Engine Sprocket for Audi A3 TT Vento VW Golf Passat Ford Peugeot Volvo Spare Parts
KWD 4
 -18%
UP1 Ultimate Fan Blade Hub and Blower Wheel Puller, Hub Puller, Fan Blade Puller Perfect for 5/8" Belt Drive and 1/2" Or Less Direct Drive Motor Shafts
KWD 16
-18%
UP1 Ultimate Fan Blade Hub and Blower Wheel Puller, Hub Puller, Fan Blade Puller Perfect for 5/8" Belt Drive and 1/2" Or Less Direct Drive Motor Shafts
KWD 16