- Shopping, made easy.
- /
- Get the app!
ALL IN ONE SET
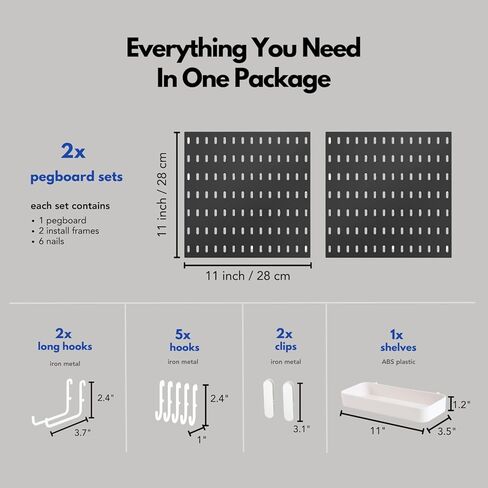
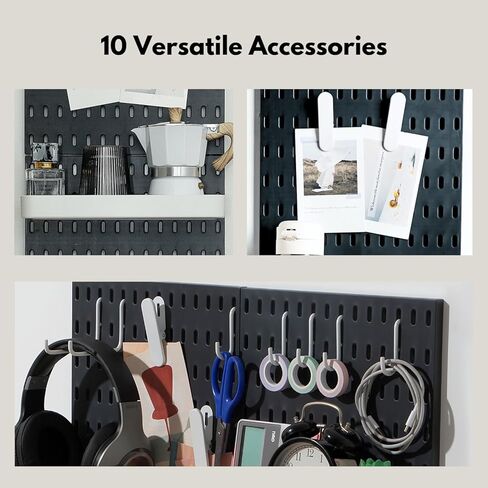
You don't have to buy wall organizer pegboard accessories separately. Our pegboard combination kit has peg boards and different accessories to meet your needs and functional usage. E.g. You can set up your pegboard wall organizer craft room with 1 shelves and 2 hooks or 2 clips & 5 hooks, or a mixture of each item. The choice is yours.
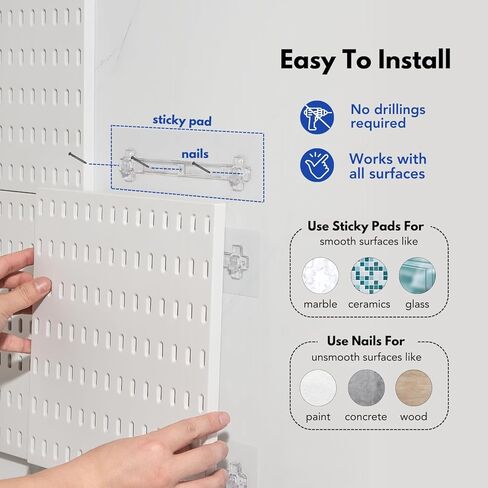
INSTALLATION INSTRUCTIONS:
1. Find out the groove on the back of the pegboard white, insert the installation frame into the groove, press tightly from top to bottom, make sure they are fitted together.
2. Clean up the wall and dry the wall with a hairdryer. Take off the film of the sticker on the installation frame, dry the sticker with hairdryer. Stick the pegboard to the wall. NOTE: THE RED ARROW ON THE PEGBOARD MUST BE UP WHEN APPLYING TO THE WALL. Press it hardly for 1 minute.
3. Remove the pegboard panels from the installation frame. Press the frame to exhaust the air bubbles in the sticker.
4. Mounting Process:
FOR MARBLE, CERAMIC, OR ANY OTHER WALLS WITH SMOOTH SURFACES: leave the installation pegboard frame for 48 hours. Then put back the wall organizer peg board to the installation frame.
FOR WALLS WITH LATEX PAINT, WALLPAPER, OR ANY OTHER UN-SMOOTH SURFACES: leave the installation frame for 48 hours. Insert the nails into the holes of the installation frame to strengthen the frame to the wall. Then put back the pegboard to the frame.
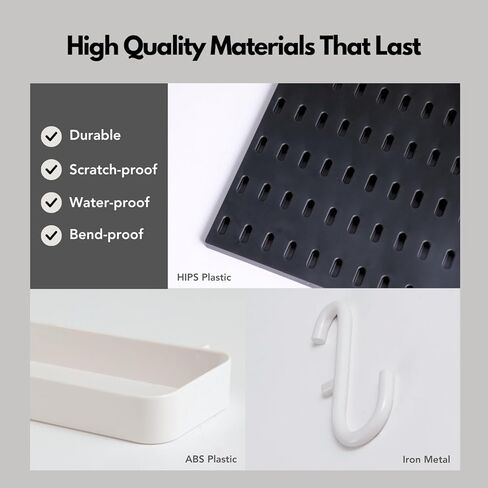
NOTE FOR THE COLOR DIFFERENCES OF THE PEGBOARDS:
For some customers' feedbacks of different colors of the pegboards, the manufacturers has improved the production process to avoid this issue. The products are now upgraded and if you do notice of any color differences, please feel free to ask for a replacement.
 -14%
BAVITE Magnetic Hooks,25lb Rare Earth Magnet Hook,New Upgraded for Home, Kitchen, Workplace, Office and Garage - 12 Pack
KWD 3
-14%
BAVITE Magnetic Hooks,25lb Rare Earth Magnet Hook,New Upgraded for Home, Kitchen, Workplace, Office and Garage - 12 Pack
KWD 3
 Deco Brothers Over The Door Hook Organizer with 11 Hooks, Black
KWD 6.500
Deco Brothers Over The Door Hook Organizer with 11 Hooks, Black
KWD 6.500
 HANGERWORLD 2 Pack Over The Door Hooks for Hangers - Extra Strong White Plastic Over Door Hook for Hanging Clothes, Towels, Robes, Hats, Bags and More
KWD 4.500
HANGERWORLD 2 Pack Over The Door Hooks for Hangers - Extra Strong White Plastic Over Door Hook for Hanging Clothes, Towels, Robes, Hats, Bags and More
KWD 4.500
 -31%
HORUSDY 238-Piece Pegboard Hooks Assortment, Pegboard Accessories with Pegboard Bins for Organizing Various Tools
KWD 10
-31%
HORUSDY 238-Piece Pegboard Hooks Assortment, Pegboard Accessories with Pegboard Bins for Organizing Various Tools
KWD 10