- Shopping, made easy.
- /
- Get the app!
⚙️ Installation Precautions ⚙️
🔋 Battery Flex Cable:
After removing the old screen, first disconnect the battery's flex cable from the device's motherboard.
Attach the new screen's flex cable without connecting power, then reconnect the battery's flex cable.
Following this sequence helps avoid static electricity affecting the new LCD panel for iPad Air 4.
📸 Face ID Components:
For devices that include Face ID, avoid touching the dot projector at the top of the panel as it is sensitive to static damage.
🔩 Speaker Screws (for iPhone replacement screens):
The screws that secure the speaker can vary by model, often including 2-4 screws of different lengths.
Organize these screws carefully to prevent using the wrong ones, which could damage the screen assembly for iPad Air 4. Avoid over-tightening.
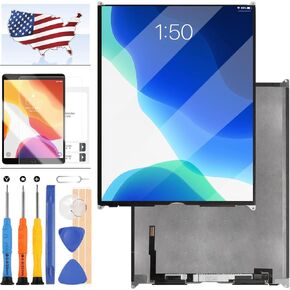
📦 Package Contents:
1x LCD Display and Touch Screen Digitizer Assembly for iPad Air 4 (2020) 10.9-inch
1x Basic Repair Tool Kit (Home Button not included)
💡 Tips for Successful Installation:
🔌 Turn off the device and disconnect the battery before installation.
🧼 Clean the LCD connectors thoroughly.
📏 Track screw placements and dimensions during disassembly.
🚫 Avoid bending flex cables over 90 degrees.
🔄 After installation, restart your device and verify functionality.
📞 After-Sales Service:
Our support team is available to help with issues related to this replacement kit for iPad Air 4 LCD and digitizer. Contact us via Amazon messaging for assistance with installation questions or concerns related to the product. We strive to ensure a positive experience for our customers.
 AMIND for Samsung Galaxy Tab S5E 10.5 Screen Replacement SM-T720 SM-T725 LCD Display Full Assembly Repair Kits with Tools
KWD 110
AMIND for Samsung Galaxy Tab S5E 10.5 Screen Replacement SM-T720 SM-T725 LCD Display Full Assembly Repair Kits with Tools
KWD 110
 A-MIND for iPad Air 5 2022 Touch Screen Replacement Touch Digitizer for iPad Air 2022 Touch Panel Glass Repair Tool Kits(Not Include LCD)
KWD 15.500
A-MIND for iPad Air 5 2022 Touch Screen Replacement Touch Digitizer for iPad Air 2022 Touch Panel Glass Repair Tool Kits(Not Include LCD)
KWD 15.500
 for iPad 10.2" 2021 Screen Replacement for iPad 9 9th Generation A2602 A2603 A2604 A2605 Touch Screen Digitizer Sensor Glass Panel Repair Parts Kit with Home Button +Tools +Protector Film
KWD 8.500
for iPad 10.2" 2021 Screen Replacement for iPad 9 9th Generation A2602 A2603 A2604 A2605 Touch Screen Digitizer Sensor Glass Panel Repair Parts Kit with Home Button +Tools +Protector Film
KWD 8.500
 for iPad 9 9th Gen 2021 LCD Screen Replacement A2602 A2603 A2604 A2605 for iPad 7th 8th Gen Screen Replacement A2197 A2270 LCD Display Panel Repair Parts Kit 10.2inch (Not Include Touch Digitizer)
KWD 35
for iPad 9 9th Gen 2021 LCD Screen Replacement A2602 A2603 A2604 A2605 for iPad 7th 8th Gen Screen Replacement A2197 A2270 LCD Display Panel Repair Parts Kit 10.2inch (Not Include Touch Digitizer)
KWD 35


