- Shopping, made easy.
- /
- Get the app!
Product parameters
The product contains a paper manual. Scan the QR code on the manual to enter the web manual, including detailed welding step diagrams and welding step videos, and instructions for setting the clock.
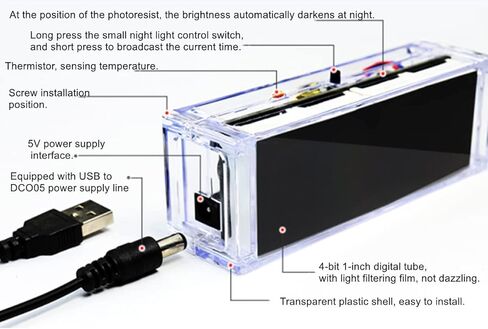
clock function:Voice timekeeping function, hourly timekeeping function, temperature display (correction), alarm clock, night light, automatic brightness adjustment, date display, week display, power-off memory
Setting
1. Reset: Press and hold 3 buttons at the same time for 5 seconds, then 12:00 is displayed, and the reset is successful. (The default is to turn off the voice and alarm functions)
2. Set time, alarm clock, hourly report
a. Adjust ‘hour': press the function button (the hour nixie tube flashes and the second flashes), press the plus button to modify the ‘hour';
b. Adjust ‘minute': press the function button again (the sub-digital tube flashes and the second point flashes), press the plus button to modify the ‘minute' (automatically start from 0 seconds);
c. Adjust the alarm ‘hour': Press the function button again (the hour digital tube flashes, the second does not flash), press the plus button to modify the alarm ‘hour';
d. Adjust the alarm ‘minute': press the function button again (the digital tube flashes, the second does not flash), press the plus button to modify the alarm ‘minute';
e. Set whether the alarm clock is on or not: press the function button again (all digits are not displayed), press the plus button, "dot 4" is on (alarm on), "dot 4" is off (alarm off);
f. Set the'Hourly Time Report' time: press the function button again (the digital tube flashes), press the plus button to modify the start time of the alarm (for example, if it is set to 9, the hourly hour report starts at 9 in the morning); press again Function button (flashing on the digital tube), press the plus button to modify the end time of the alarm (for example, if it is set to 23, there will be an hourly report from 9 am to 23 pm, and there is no hourly hour report when resting at night, which does not affect sleep);
g. Set whether the hourly hour report is on: press the function button again (all the numbers are not displayed), press the plus button, "point 3" is on (on the hour), "point 3" is off (the hour is off)
h. Press the function key to exit and the setting is complete.
3. Temperature correction, setting date, day of the week Press
Warm prompt
The product is a spare part, which needs to be welded and assembled by yourself.
 -17%
Hosley 9 Inch Long Rattan Diffuser Reeds Set of 6 Packages Total 60 Reeds. Ideal Gift and for Use with Hosley Diffuser Glass Bottles Diffuser Refills Spa and Aromatherapy O9
KWD 2.500
-17%
Hosley 9 Inch Long Rattan Diffuser Reeds Set of 6 Packages Total 60 Reeds. Ideal Gift and for Use with Hosley Diffuser Glass Bottles Diffuser Refills Spa and Aromatherapy O9
KWD 2.500
 Arch Instrument 11" Antique Brass Armillary Sphere with Sundial Arrow Nautical Maritime Astrolabe Engraved Globe
KWD 24
Arch Instrument 11" Antique Brass Armillary Sphere with Sundial Arrow Nautical Maritime Astrolabe Engraved Globe
KWD 24
 Luckly Horseshoes Dream Catcher Handmade Dream Catchers for Bedroom Wall Hanging Home Decor Ornaments Craft Men Women
KWD 10
Luckly Horseshoes Dream Catcher Handmade Dream Catchers for Bedroom Wall Hanging Home Decor Ornaments Craft Men Women
KWD 10
 Creative Co-Op Large Whitewashed Woven Water Hyacinth Lantern with Glass Insert & Handle
KWD 22.500
Creative Co-Op Large Whitewashed Woven Water Hyacinth Lantern with Glass Insert & Handle
KWD 22.500