- Shopping, made easy.
- /
- Get the app!
RK114-NR3XL
Pressure Reducing Valve Repair Kit
HOW TO REASSEMBLE:
1. While disassembled, open inlet of water service to flush out valve body and service line of debris.
2. Replace old cartridge assembly with new cartridge assembly. Push the cartridge into bore in body making sure o-rings seal tight against both the cartridge and body.
3. Replace friction ring, spring, spring disc and bell housing. (Make sure friction ring is installed with raised edge facing up). Tighten bell housing onto body by threading clockwise.
4. Turn adjustment bolt into bell housing to old setting.
5. Enter dwelling and turn on several faucets.
6. Turn on water service. Let water run for several seconds then turn off faucets in dwelling.
7. Adjust regulator to desired pressure by turning adjustment bolt clockwise (into bell housing) to raise pressure or counterclockwise (out of bell housing) to lower pressure.
NOTE: When reducing pressure open a downstream faucet to relieve pressure.
8. Tighten locknut when desired pressure is achieved.
INSTALLATION INSTRUCTIONS
Before installing reducing valve, flush out line to remove loose dirt and scale which might damage seal ring and seat.
Install valve in line with arrow on valve body pointing in direction of flow.
All valves will be furnished with stock settings to reduce to 50 psi. To readjust reduced pressure, loosen outer locknut and turn adjustment bolt clockwise (into bell housing) to raise reducedpressure, or counterclockwise (out of bell housing) to lower reduced pressure. May be installed in horizontal or vertical position.
 For 1989-2004 Evinrude Johnson 0435567 0339849 Trim Tilt O-Ring Rebuild Kits
KWD 7.500
For 1989-2004 Evinrude Johnson 0435567 0339849 Trim Tilt O-Ring Rebuild Kits
KWD 7.500
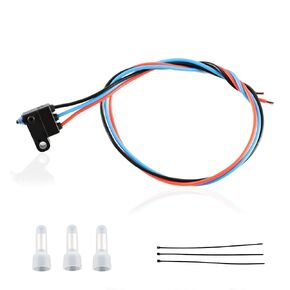 HIMARKLIF Shifter Micro Switch Parking Position Switch Repair kit Compatible with Ford F-150 2011-2014 Ford Lobo 2011-2014 Lincoln Mark LT 2011-2014 Replace#:905-026 BL3Z7210CB BL3Z7210CA
KWD 15.500
HIMARKLIF Shifter Micro Switch Parking Position Switch Repair kit Compatible with Ford F-150 2011-2014 Ford Lobo 2011-2014 Lincoln Mark LT 2011-2014 Replace#:905-026 BL3Z7210CB BL3Z7210CA
KWD 15.500
 GM Interior, Exterior, Engine Bay, Chassis | Body Bolts Hardware (3/8-16 x 1 1/2) FITS: Classic, Antique Chevrolet, Buick, Oldsmobile, Pontiac, Cadillac, GMC Trucks, GM A | B | C | D | E | F | G Body
KWD 6.500
GM Interior, Exterior, Engine Bay, Chassis | Body Bolts Hardware (3/8-16 x 1 1/2) FITS: Classic, Antique Chevrolet, Buick, Oldsmobile, Pontiac, Cadillac, GMC Trucks, GM A | B | C | D | E | F | G Body
KWD 6.500
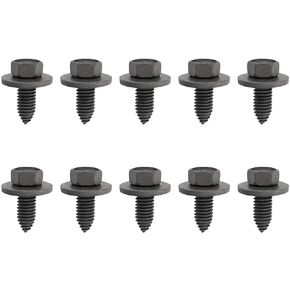 GM Interior, Exterior, Engine Bay, Chassis | Body Bolts Hardware (3/8-16 x 1) FITS: Classic, Antique Chevrolet, Buick, Oldsmobile, Pontiac, Cadillac, GMC Trucks, GM A | B | C | D | E | F | G Body Cars
KWD 6.500
GM Interior, Exterior, Engine Bay, Chassis | Body Bolts Hardware (3/8-16 x 1) FITS: Classic, Antique Chevrolet, Buick, Oldsmobile, Pontiac, Cadillac, GMC Trucks, GM A | B | C | D | E | F | G Body Cars
KWD 6.500


