- Shopping, made easy.
- /
- Get the app!
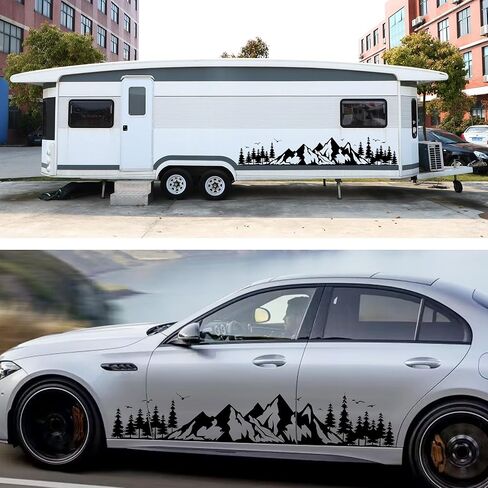
★ Since the sticker is rolled up during packaging, when you receive the product, you will see bubbles in the transfer membrane, but the sticker is intact, it will not have any impact on your stickiness and effect. After the sticker is finished, the transfer membrane needs to be removed.
▲ |INSTALLATION DETAILS|
☞ Lay the decals out flat with something heavy on it before use to make the decal flatter.☜
1. After cleaning the car to remove dust, spray water on the car to reduce the viscosity of the decal.
2. After removing the bottom paper of the decal, spray more water on the side of the decal with glue to reduce the viscosity, which is convenient for adjusting the position and removing bubbles.
3. Fix one corner of the decal on the car body, the other parts always keep the lifted state, use the felt scraper to slowly scrape off the water inside the decal, until the decal and the car body are fully affixed.
NOTE: Bubbles appear during installation, you can slowly peel off the decal, again sprayed with a lot of soapy water and continue to scrape.
4. Finally, remove the transparent transfer film slowly.
5. The extra stickers at the door and the seam can be cut off with a knife.
ps: Due to the large size of the sticker, two or more people can work together to complete the sticker.
SPECIFICATIONS:
Package includes: 2x Mountain car stickers.
Material: Vinyl sticker.
Available sizes: Large/Medium.
Color: Black / White.
TIPS:
▶ Do not wax the car one week before using the sticker. The wax will make the sticker not sticky.
▶ Do not wash your car within one week after filming. It is best not to expose it to exposure within 24 hours.
NOTE:
1. Due to manual measurement, please allow a deviation of 1-3 mm.
2. If you find any problems, please leave us a message and we will answer your questions.
 TOMALL 6Pcs Universal Car Front Bumper Lip Splitter Black Exterior Soft Rubber Fins Spoiler Canards Kit for Car Body Auto Anti-collision Strip Decoration Accessories Stickers for Car (Black)
KWD 5.500
TOMALL 6Pcs Universal Car Front Bumper Lip Splitter Black Exterior Soft Rubber Fins Spoiler Canards Kit for Car Body Auto Anti-collision Strip Decoration Accessories Stickers for Car (Black)
KWD 5.500
 TOMALL 2Pcs Universal Car Corner Protecor Carbon Fiber Strip Stickers for Front Rear Bumper Fender Guard Car Body Anti-Collision Strip Accessories for Cars SUV Truck
KWD 5.500
TOMALL 2Pcs Universal Car Corner Protecor Carbon Fiber Strip Stickers for Front Rear Bumper Fender Guard Car Body Anti-Collision Strip Accessories for Cars SUV Truck
KWD 5.500
 TOMALL Headlight Sidemarker Vinyl Films Smoke Tint Compatible with Honda Accord 2018-2022 20% Light Transmission Amber Edges Delete Stickers Decorations for Car (20% Dark Black)
KWD 4
TOMALL Headlight Sidemarker Vinyl Films Smoke Tint Compatible with Honda Accord 2018-2022 20% Light Transmission Amber Edges Delete Stickers Decorations for Car (20% Dark Black)
KWD 4
 TOMALL Grille Inserts Stripes Trims Compatible with BMW F20 F30 2011-2021 Car V Brace Wrap Covers Exterior Accessories Decoration for 1/2/3/4/5 Series 320i 328i 330i 335i 428i (Red)
KWD 7
TOMALL Grille Inserts Stripes Trims Compatible with BMW F20 F30 2011-2021 Car V Brace Wrap Covers Exterior Accessories Decoration for 1/2/3/4/5 Series 320i 328i 330i 335i 428i (Red)
KWD 7